Local Movers
 Last-Minute Movers
 Junk Removal
 Long Distance Movers
 Piano Movers
 Heavy Equipment
 Commercial Movers
 Moving Container
 Car Transportation
 Furniture Movers
 Truck Rental
 Moving Cost Calculator
 Moving Planner
 Packing Calculator
 Moving Checklist
 Moving Insurance
 FAQ
FAQ Contact Us
 Moving Loan
 About Us
How to Pack Posters for Moving – Tips to Prevent Creases and Damage
How to Pack Posters for Moving – Step-by-Step Guide
Moving is stressful enough without worrying about your favorite posters getting bent, creased, or ruined. Posters—whether they’re band prints, movie memorabilia, or limited-edition artwork—are often more than just decoration. They can hold sentimental value, cost hundreds of dollars, and sometimes be irreplaceable. Unfortunately, posters are also one of the most delicate items to transport. A single fold, tear, or bit of moisture can ruin them permanently.
The good news? With the right techniques, you can protect your posters so they arrive at your new home in the same condition they left. This step-by-step guide covers everything you need to know—from choosing the right supplies to rolling, flat packing, labeling, and storing posters safely during your move.
Before You Begin
Choosing the Right Storage Method
The very first step is deciding how to pack your posters. Not all posters are created equal. A cheap dorm-room print doesn’t need the same level of protection as a rare, signed movie poster worth $500.
- Flat packing is ideal for framed or valuable prints. Keeping them flat prevents creasing, edge wear, and curling that can happen with rolled posters. If you have any posters that are framed with glass, flat packing is the only safe option.
- Rolling works best for unframed posters. It’s space-saving, practical, and usually safe—as long as you use a sturdy tube. However, rolling should never be used for posters that you plan to frame immediately upon arrival, because the curl can be hard to remove.
💡 Pro Tip: If you’re unsure, lean toward flat packing. It takes more space but offers better protection against damage.
Choosing Packing Containers
Once you know whether to roll or pack flat, you’ll need the right containers.
- For rolled posters, invest in sturdy mailing tubes with hard plastic end caps. Avoid thin cardboard gift-wrap tubes from craft stores—they crush easily and don’t provide real protection.
- For flat packing, use large flat boxes, portfolios, or foam boards. An oversized flat box with protective padding keeps posters safe from bending.
If your posters are framed, measure the frame size and get boxes that fit snugly without leaving too much empty space. For unframed posters, tubes should be at least 3 inches in diameter to avoid rolling too tightly.
💡 Tip: You can often find free or cheap poster tubes at office supply stores, art shops, or even through online sellers. Just make sure they’re sturdy enough for moving.
Packing Materials
Posters don’t require expensive supplies, but the right materials make a huge difference. Gather these before you start:
- Acid-free tissue paper – Keeps ink from transferring and prevents smudges or creases. Regular paper can cause discoloration over time.
- Poster tubes with end caps – Sturdy, crush-resistant, and reusable.
- Large flat boxes or portfolios – Perfect for high-value or framed posters.
- Foam board or cardboard sheets – To sandwich posters for added protection.
- Bubble wrap or foam sheets – Adds cushioning during transport.
- Plastic sleeves or bags – Protects against moisture and humidity.
- Packing tape & marker – For sealing and labeling.
💡 Eco-friendly hack: If you don’t want to buy bubble wrap, you can use clean towels, bedsheets, or even T-shirts as padding for flat-packed posters.
Step-by-Step Instructions: How to Pack Posters for Moving
Prepare the Posters
Before you begin packing, spend a few minutes preparing your posters. It may not seem necessary, but this step makes a big difference in protecting them during the move.
First, check the condition of your posters. Wipe down frames gently with a soft microfiber cloth to remove dust or debris that could scratch the surface during packing. If your posters are already inside plastic sleeves, make sure they’re clean and free of dirt. For loose, unframed posters, lay them on a flat surface and place a sheet of acid-free tissue paper on both the front and back. This prevents ink transfer, surface scratches, and discoloration that can happen with regular paper.
If you own rare or collectible posters, slipping them into archival-quality plastic sleeves adds an extra layer of protection. These sleeves help guard against moisture and humidity, which are especially risky if your posters will be stored temporarily in a truck or storage unit. Think of this as insurance for your artwork—the extra effort now prevents irreversible damage later.
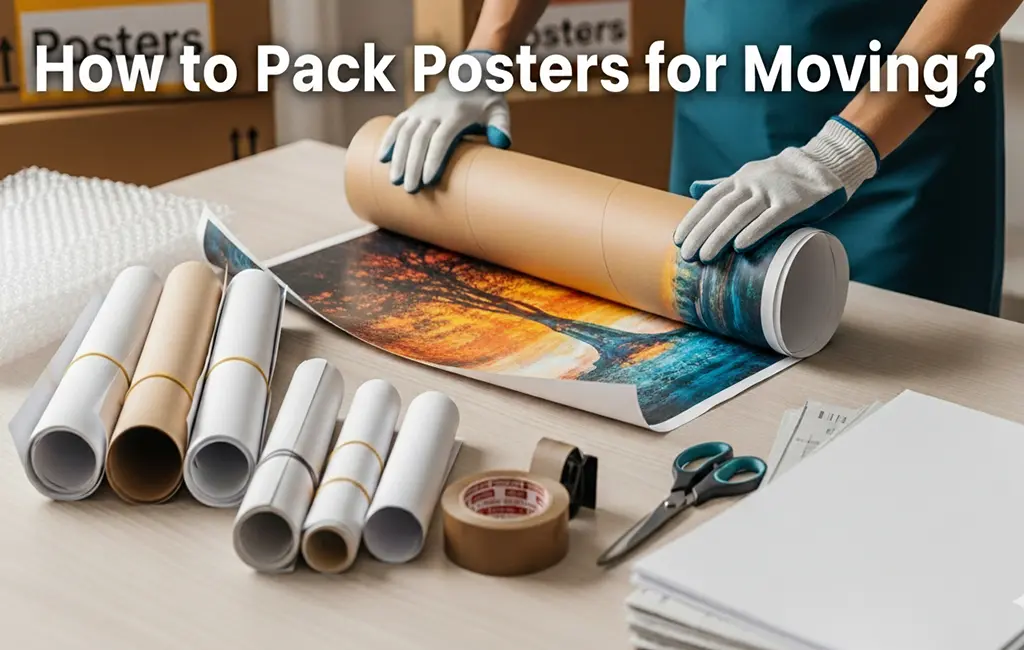
Roll Posters for Tubes
For most unframed posters, rolling is the most convenient and space-saving option. However, it must be done correctly to avoid damaging the poster.
- Start by laying out a sheet of acid-free tissue paper that’s a little larger than the poster itself.
- Place the poster face-up on top of the tissue paper. Carefully roll from one end to the other, keeping the roll loose. If you roll too tightly, the paper fibers may stretch, leaving permanent curl marks that are nearly impossible to remove.
- Once rolled, slide the poster gently into a sturdy mailing tube. Avoid forcing it inside—if the tube is too narrow, use a larger one instead. A tube with a diameter of at least 3 inches is recommended.
- If there’s any empty space left inside the tube, fill it with crumpled tissue paper or bubble wrap to prevent the poster from sliding around.
- Finally, secure both ends with strong plastic end caps. For extra safety, place a strip of packing tape over the caps to ensure they don’t pop open during transit.
💡 Pro Tip: Always pack one poster per tube. While it might seem easier to roll two or three together, this leads to scratches, dents, and edge wear. Treat each poster individually for maximum protection.
Flat Pack Valuable Posters
If you’re moving high-value, framed, or oversized posters, rolling them is risky. Instead, use flat packing, which provides maximum protection.
- Lay the poster flat and sandwich it between two pieces of foam board or thick cardboard, cut slightly larger than the poster. This acts as a rigid shield to prevent bends and creases.
- Wrap the entire poster-and-board “sandwich” in plastic wrap or tissue paper. This not only secures everything in place but also keeps moisture out.
- Place the wrapped poster inside a flat box or artist’s portfolio case. Make sure there’s padding (bubble wrap, foam sheets, or even towels) along the edges to prevent the poster from sliding.
- Seal the box carefully with strong packing tape, making sure all sides are tightly closed.
Flat packing is the gold standard for rare or sentimental posters. It takes up more space than tubes, but it ensures the posters arrive exactly as they were—flat, smooth, and undamaged.
Label and Organize
Labeling your packed posters might seem like an afterthought, but it’s a key step that saves stress during unpacking and prevents accidental damage.
Use a permanent marker to clearly label each tube or flat box. Be specific—write something like “Vintage Movie Posters – Fragile – Do Not Bend” instead of just “Posters.” Not only will this alert movers to handle with care, but it will also help you locate the right posters quickly once you arrive at your new place.
If you’re moving several posters, number the boxes or tubes (e.g., Tube 1 of 4, Tube 2 of 4). This way, you can check at a glance if anything is missing during the move.
Extra Tips for Poster Packing Success
- Avoid damp environments. Posters are highly sensitive to humidity. Never store them in basements, garages, or attics during your move, even for a short time. Moisture can cause warping, smudging, or mold growth.
- Protect against heat. If you’re moving in summer, moving trucks can get extremely hot. Place silica gel packs inside tubes or boxes to absorb excess moisture and reduce humidity risk.
- Travel with your valuables. If you own rare or high-value posters, keep them with you instead of loading them into the moving truck. The climate control inside your car is safer than the back of a hot, jostling truck.
Conclusion
Posters may not be heavy like furniture or fragile like dishes, but they’re deceptively delicate. A crease, rip, or bit of moisture can permanently ruin them. That’s why taking the time to pack them correctly—using tissue paper, sturdy tubes, flat boxes, and clear labeling—is worth the effort.
By following the right steps along with packing calculator, you’ll not only protect your posters during the move but also make unpacking and displaying them in your new home stress-free. Whether it’s a cheap wall print or a prized collectible, these packing techniques ensure your posters arrive in perfect condition.
FAQ
1. What is the best way to pack posters for moving?
The best method depends on the poster’s value. For cheap or decorative posters, rolling into sturdy tubes works fine. For collectible or framed posters, flat packing is safer to avoid permanent curls or damage.
2. Can I use gift-wrap tubes for moving posters?
No. Gift-wrap tubes are thin and crush easily. Always use heavy-duty mailing or art tubes with end caps.
3. How do I protect posters from moisture during moving?
Slip posters into plastic sleeves or wrap tubes in plastic stretch wrap. For long-distance moves, silica gel packs help prevent humidity damage.
4. Should posters be rolled or packed flat?
Unframed posters are best rolled. Framed or high-value posters should always be packed flat.
5. Can I pack multiple posters in one tube?
It’s not recommended. Rolling more than one poster per tube causes scratches and dents. Stick to one per tube for safety.
Categories
- Long Distance Moving157
- Local Moving120
- Commercial Moving40
- Residential Moving34
- Last – Minute Moving25
- Moving Tips & Lifestyle11
- Furniture Moving9
- Moving Tips & How-To Guides8
- Moving services7
- Moving Costs & Budgeting6
- Moving Cost5
- Moving Cost Calculator5
- Moving Tips5
- Moving Guides5
- moving tips4
- Moving companies4
- state to state movers4
- Piano Moving3
- Car Transportation3
- Truck Rental3
- Moving Container3
- Local Move3
- best moving rates3
- cheap moving companies3
- affordable moving companies3
- full-service movers3
- Moving3
- Long-Distance Moving3
- Moving Cost Guides3
- Moving Tips & Planning3
- Junk Removal2
- Senior Moving2
- Senior Relocation Moving Companies2
- Moving Tools2
- Moving Estimates2
- interstate moving2
- College Moving2
- Dorm Moving2
- Tips for moving2
- cross-country move2
- International moving2
- Household moving2
- Relocation Guide2
- Moving Tips & State Guides2
- Heavy Equipment1
- Senior Moving Services1
- office moving1
- office relocation1
- employee relocation1
- Car Transport1
- Vehicle Shipping1
- Car Shipping Services1
- Artificial Intelligence1
- Office Moving Services1
- Commercial Moving Companies1
- Corporate Moving Services1
- Corporate Movers1
- full-service moving companies1
- sustainable moving companies1
- green movers1
- Moving in US1
- Best places to move in 20251
- 2025 moving1
- Full-Service Moving Companies1
- College moving services1
- Moving to College1
- Moving Season1
- Spring Moving1
- donate1
- sell1
- Movers in California1
- Movers in Studio City1
- Moving to California1
- Laws about Moving into California1
- Moving Laws1
- House moving1
- packing1
- cheap moving ways1
- Moving guide1
- moving across countries1
- international relocation program1
- move out cleaning1
- right packing supplies1
- pack while moving1
- Apartment moving1
- PODS1
- moving out1
- Long distance moving1
- state to state move1
- California movers1
- Truck Rental1
- US Territory Relocation1
- International Moving1
- Shipping & Moving Tips1
- Moving Budget Guide1
- Moving Tools & Equipment Guides1
- Moving Services & Options1
- Moving Tips & How-To Guides1
- Moving Day & Settling In1
- Mobile Home Moving1
- Moving Guide & Tips1
- Moving Tips & State Comparisons1
- Moving Tips & City Guides1
- Moving Tips & Cost Guides1
- Long-Distance Moving Tips1
- Moving Tips & Financial Planning1
- Moving Tips & Home Preparation1
- Vehicle Shipping & Auto Transport1
- Marketing & Lead Generation1
- International Moving Guides1
- Moving Costs1
- San Francisco Moving Guide1
- NYC Moving1
- Local Movers1
- Budget Moving1
- Student Moving1
- Affordable Moving1
- Specialty Moving Guides1
- Local & Long-Distance Moving1
- long distance moving1
- Boston Moving Guide1
- Europe Relocation Guide1
- Moving Costs & Specialty Moving1
- Cost of Living1
- Relocation1
- International Moving1
- Lifestyle & Relocation1
- State Guides1
- Home Buying Guide1
- Moving Timeline1
- Real Estate Tips1
- Appliance Moving1
- Packing & Preparation1
- Interstate Relocation1
- City-to-City Moving Guide1
- Technology for Movers1
- Moving Reviews1
- Moving Costs & Storage1
- Moving Tips & Equipment Guides1
- Moving Guides & Cost Insights1
- Moving Supplies1
- Packing Tips1
- Home Moving1
- Relocation Tips1
- State Moving Guides1
- New Home Guide1
- Relocation Advice1