


 Local Movers
 Last-Minute Movers
 Junk Removal
 Long Distance Movers
 Piano Movers
 Heavy Equipment
 Commercial Movers
 Moving Container
 Car Transportation
 Furniture Movers
 Truck Rental
 Moving Cost Calculator
 Moving Planner
 Packing Calculator
 Moving Checklist
 Moving Insurance
 FAQ
FAQ Contact Us
 Moving Loan
 Privacy Policy
 Join Our Network
 About Us
Aquarium Moving Guide: Safely Relocate Your Fish Tank


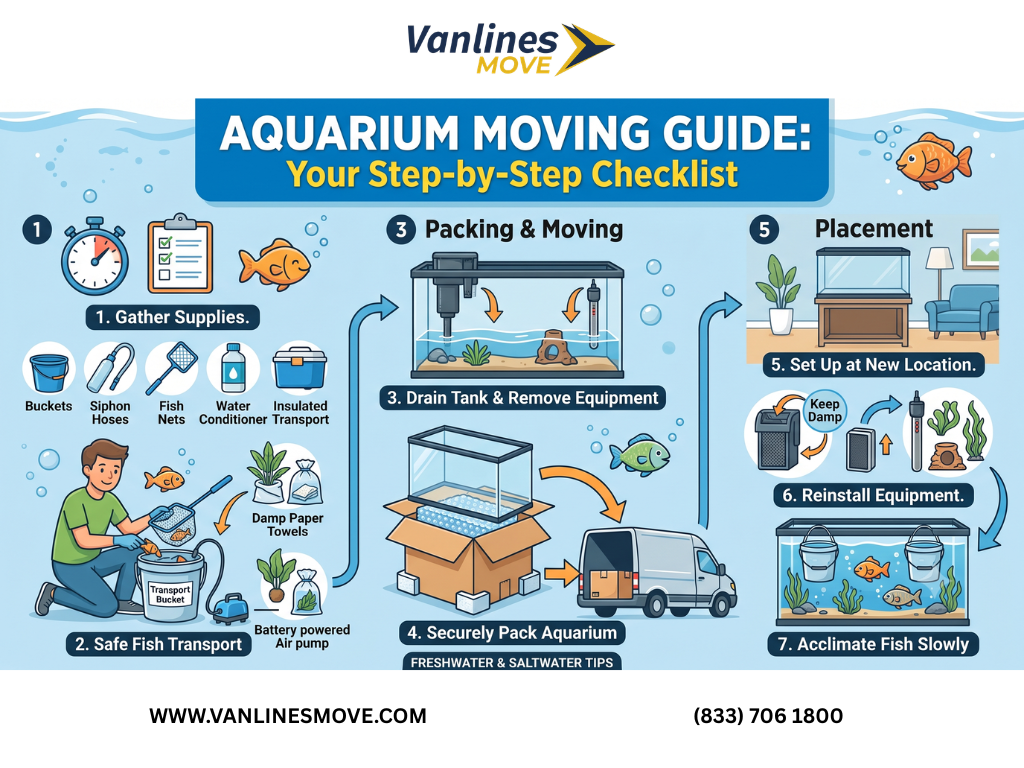
Moving an aquarium is not a task to be taken lightly. Unlike relocating a sofa or a box of clothes, an aquarium houses delicate, living organisms and a finely balanced ecosystem. A successful move requires meticulous planning, careful execution, and a deep understanding of the unique challenges involved. From the stress on your fish to the sheer weight and fragility of the tank itself, every step must be handled with precision to ensure the health and survival of your aquatic inhabitants and the integrity of your setup.
This comprehensive guide will walk you through the entire process of safely relocating your fish tank, whether it's across the room or across the country. We'll cover everything from pre-move preparation and gathering essential supplies to the delicate process of moving your livestock, disassembling, transporting, and finally, reassembling your aquarium in its new home. By following these detailed steps, you can significantly reduce stress on your fish and minimize potential damage to your valuable equipment, ensuring a smooth transition for your underwater world.
Why Moving an Aquarium is Challenging
Relocating an aquarium presents a unique set of difficulties that go beyond typical household moving. Understanding these challenges is the first step toward a successful move.
Stress on Livestock
Fish, invertebrates, and corals are highly sensitive to changes in their environment. The process of catching them, transferring them to temporary containers, and exposing them to new water parameters or temperatures can induce significant stress. This stress can weaken their immune systems, making them susceptible to illness or even leading to death. Minimizing handling time, maintaining stable water conditions during transport, and ensuring proper aeration are crucial for their survival.
Weight and Fragility
Aquariums, especially larger ones, are incredibly heavy even when empty. A 55-gallon tank can weigh over 600 pounds when full, and even an empty 100-gallon tank can weigh more than 150 pounds. This substantial weight, combined with the inherent fragility of glass or acrylic, makes them difficult and risky to move. Improper lifting or handling can lead to cracks, leaks, or complete breakage. The stand, often designed specifically for the tank's weight, must also be considered for its structural integrity and ease of transport.
Maintaining Water Parameters and Beneficial Bacteria
The stability of water parameters (temperature, pH, ammonia, nitrite, nitrate) is vital for the health of an aquatic ecosystem. During a move, these parameters can fluctuate wildly. Furthermore, the beneficial bacteria that form the biological filter, essential for processing waste, primarily reside in the filter media and substrate. If these bacteria die off due to lack of oxygen, temperature changes, or drying out, the tank can experience a "mini-cycle" in the new location, leading to toxic ammonia and nitrite spikes that are deadly to fish. Preserving these bacteria is paramount.
Pre-Move Planning: The Essential First Steps
Thorough planning is the cornerstone of a successful aquarium move. Start preparations at least one to two weeks in advance, especially for larger or more complex setups.
Assess Your Aquarium Size and Type
The size and type of your aquarium will dictate the complexity of the move. A small 10-gallon freshwater tank is far simpler to relocate than a 150-gallon saltwater reef tank. Consider:
- Volume: Larger tanks require more manpower, specialized equipment, and potentially professional movers.
- Type: Freshwater, saltwater, planted, or reef tanks each have specific requirements for livestock and equipment handling. Saltwater tanks, with live rock and corals, are particularly complex.
- Contents: The number and type of fish, invertebrates, live plants, and corals will influence how many temporary containers you need and the care required during transport.
Gather Necessary Supplies
Having all your supplies ready before you begin is critical. Don't wait until the last minute.
- Temporary Fish/Livestock Containers: Food-grade buckets (5-gallon buckets are ideal), insulated coolers, or specialized fish bags. Ensure they are clean and free of chemical residues.
- Air Pumps and Air Stones: Battery-operated air pumps are essential for providing oxygen to fish in temporary containers during transport, especially for longer distances.
- Heaters: Small, submersible heaters for temporary containers if the ambient temperature is low, or if fish are particularly sensitive to temperature fluctuations.
- Nets: Appropriate sizes for catching your fish and invertebrates.
- Water Siphon/Hoses: For draining water from the tank.
- Towels and Sponges: For spills and drying the tank.
- Packing Materials: Bubble wrap, packing peanuts, cardboard boxes, newspaper for equipment, decorations, and the empty tank.
- Empty Buckets: Several clean, food-grade buckets for saving tank water and storing substrate/decorations.
- Filter Media Storage: A small container with tank water to keep filter media submerged and alive.
- Power Strips and Extension Cords: For setting up temporary aeration/heating.
- Dolly or Furniture Mover: For larger, heavier tanks and stands.
- Water Dechlorinator/Conditioner: For preparing new water if needed.
- Water Testing Kit: To monitor parameters before, during, and after the move.
Acclimate Fish to Temporary Housing (If Applicable)
For highly sensitive or large fish, you might consider pre-acclimating them to their temporary containers for a few days before the actual move. This can reduce the shock of being caught and confined on moving day. Ensure these temporary setups have proper filtration and heating.
Consider Professional Help
For very large aquariums (e.g., 100 gallons or more), complex reef tanks, or long-distance moves, hiring professional aquarium movers or even general moving companies experienced with delicate items is highly recommended. They have the specialized equipment, expertise, and insurance to handle such a valuable and fragile item. If you're planning a significant cross-country move, such as moving from California to Idaho, the logistics of transporting an aquarium safely can become overwhelming without professional assistance.
The Moving Process: Step-by-Step Guide
This section details the actual steps to dismantle, move, and reassemble your aquarium.
Day Before/Morning Of: Preparation
- Stop Feeding Fish: Cease feeding your fish 24-48 hours before the move. This reduces waste production, keeping temporary transport water cleaner and reducing ammonia buildup.
- Lower Water Level: If possible, drain a small amount of water (e.g., 10-20%) the day before to make it easier to catch fish and reduce spill risk.
- Prepare New Location: Ensure the new aquarium stand is in place and level, and that all necessary power outlets are accessible.
Draining Water and Removing Livestock
This is the most critical and delicate phase.
- Drain Tank Water: Using a siphon, drain about 50-75% of the tank water into clean, food-grade buckets. This saved water is invaluable for reducing shock when fish are reintroduced to the tank, as it maintains familiar water parameters and beneficial bacteria. For a larger move, you may need to save less due to weight or logistics, but always save as much as practical.
- Remove Decorations and Plants: Carefully remove all decorations, rocks, and live plants. Place them in buckets with some tank water to keep them moist and preserve any beneficial bacteria. Live plants should be kept submerged or wrapped in damp paper towels.
- Catch Fish: This requires patience and a gentle hand. Use two nets if possible: one to herd the fish, the other to scoop them. Minimize chasing to reduce stress. Place fish immediately into prepared temporary containers (buckets or coolers) filled with saved tank water. Ensure these containers have battery-operated air pumps running. Do not overcrowd.
- Move Invertebrates/Corals: Handle these with extreme care. Place corals in individual containers or bags with tank water, ensuring they are stable and won't roll. Invertebrates like shrimp and snails can go into fish containers or separate ones, depending on species compatibility.
- Preserve Filter Media: This is crucial for maintaining your biological filter. Remove all filter media (sponges, ceramic rings, bio-balls) from your filter. Place them in a bucket with saved tank water. Do NOT let them dry out or expose them to extreme temperatures, as this will kill the beneficial bacteria.
Disassembling the Tank
Once all livestock and filter media are safely stored, you can fully dismantle the tank.
- Drain Remaining Water: Siphon out any remaining water from the tank.
- Remove Substrate: Scoop out gravel or sand. You can either discard it and replace with new substrate in the new location or, for established tanks, save a portion in buckets with a little tank water to help re-seed beneficial bacteria. Be aware that substrate is very heavy.
- Remove Equipment: Disconnect and remove all heaters, filters, lights, pumps, and other accessories. Clean them as needed.
- Pack Equipment: Wrap delicate equipment like heaters and lights in bubble wrap. Place smaller items in clearly labeled boxes. Keep all filter parts together. If you're also moving a car, remember that proper packing extends to all your belongings, not just the aquarium gear.
- Clean and Dry Tank: Wipe down the inside and outside of the empty tank. Ensure it is as dry as possible to prevent mold and reduce weight.
- Prepare Tank for Transport: For glass tanks, consider placing cardboard or styrofoam sheets inside to protect against internal impact. Wrap the entire tank in moving blankets or bubble wrap. Secure it with tape.
Transporting the Tank and Livestock
This phase is about safe transit.
- Secure the Empty Tank: The empty aquarium should be transported upright if possible, especially larger tanks. Secure it firmly in the moving vehicle to prevent shifting, sliding, or tipping. Use straps, blankets, and padding. Avoid placing heavy items on or against it.
- Transport Livestock Containers: Place fish and invertebrate containers in a climate-controlled area of your vehicle. Insulated coolers are excellent for maintaining stable temperatures. Ensure air pumps are running for the entire journey. Check on the livestock periodically if possible, especially on long hauls. Avoid direct sunlight or extreme cold.
- Transport Saved Water: If you saved tank water, ensure the buckets are securely sealed and upright to prevent spills. This water can be heavy, so plan its placement carefully.
- Transport Equipment and Substrate: These can be packed with other household goods, ensuring fragile items are well-protected.
For those undertaking long-distance moves, such as moving from Florida to New Jersey, the logistics of maintaining a stable environment for your aquatic life during transit become even more critical. Consider the travel time and potential stops, and plan for continuous aeration and temperature control.
Setting Up in the New Location
The goal here is to re-establish the aquarium as quickly and smoothly as possible, minimizing stress on your fish.
Prepare the Stand and Location
Before bringing the tank in, ensure the stand is precisely where you want it and is perfectly level. Uneven weight distribution can stress the glass seams and lead to leaks. Clean the area around the stand.
Reassemble the Tank
- Place the Tank on the Stand: Carefully lift the empty, dry tank onto its stand. Ensure it's centered and stable.
- Add Substrate: If reusing, rinse it lightly with old tank water if it's been stored. Spread it evenly.
- Replace Decorations and Plants: Arrange your rocks, driftwood, and plants as desired.
- Install Equipment: Reinstall your filter, heater, air stone, and other equipment. Do NOT plug them in yet.
Reintroduce Water and Substrate
- Add Saved Tank Water: Carefully pour the saved tank water back into the aquarium, trying not to disturb the substrate too much.
- Top Off with New Water: If you don't have enough saved water, slowly add dechlorinated, temperature-matched fresh water.
- Start Filter and Heater: Once the tank is mostly full, plug in your filter and heater. Allow the heater to bring the water to the correct temperature before reintroducing fish.
Acclimate Livestock Back to the Main Tank
Once the tank temperature is stable and the filter has been running for a short while:
- Temperature Acclimation: Float the fish/invertebrate containers in the main tank for 15-30 minutes to equalize temperatures.
- Water Acclimation: Slowly add small amounts of main tank water to the temporary containers over a period of 30-60 minutes. This helps fish adjust to the new water parameters.
- Release Livestock: Gently net the fish and transfer them to the main tank. Avoid adding the transport water from the temporary containers directly into the main tank, as it may contain accumulated waste.
Monitor and Maintain
For the next few days to weeks, closely monitor your aquarium. Test water parameters daily for ammonia, nitrite, and nitrate. Be prepared for a mini-cycle, especially if your filter media dried out or if you couldn't save much tank water. Perform small, frequent water changes if ammonia or nitrite levels rise. Observe your fish for signs of stress or illness.
Special Considerations for Different Aquarium Types
While the general steps apply, certain aquarium types demand extra attention.
Freshwater Aquariums
Generally the easiest to move. The primary concerns are temperature stability, oxygenation during transport, and preserving beneficial bacteria. If you have live plants, ensure they remain moist during the move.
Saltwater Aquariums
These are significantly more challenging.
- Live Rock: Live rock is porous and full of beneficial bacteria and microfauna. It must be kept wet and aerated during transport. Place it in buckets with tank water and an air stone. If it dries out, the die-off can cause a massive ammonia spike.
- Corals: Extremely sensitive to changes. Transport them in individual containers or bags with plenty of tank water, ensuring they are stable. Maintain temperature and aeration.
- Salinity: Ensure the salinity of your saved water and any new water matches precisely. Use a refractometer.
- Sumps/Refugiums: These will need to be drained and packed separately, with their contents (e.g., refugium substrate, macroalgae) handled similarly to the main tank's.
Large Aquariums
Any tank over 75-100 gallons typically requires multiple strong individuals to move, even when empty. Consider renting a heavy-duty dolly or hiring professional movers. The risk of injury or tank damage increases exponentially with size. Professional services often have specialized equipment like tank dollies and suction cups for safe handling.
Post-Move Care and Monitoring
The period immediately following the move is crucial for the long-term health of your aquarium.
- Water Parameters Testing: Continue to test your water daily for at least two weeks. Pay close attention to ammonia and nitrite. Any significant spike indicates a compromised biological filter.
- Observe Fish for Stress/Illness: Watch for clamped fins, rapid breathing, hiding, lack of appetite, or signs of disease (e.g., ich, fin rot). Be prepared to treat if necessary.
- Gradual Feeding: Resume feeding very lightly initially, gradually increasing to normal amounts over a few days. This helps prevent excess waste production while the biological filter recovers.
- Water Changes: If ammonia or nitrite levels rise, perform small (10-20%) daily water changes using dechlorinated, temperature-matched water. Avoid large water changes unless absolutely necessary, as they can add further stress.
- Patience: The aquarium ecosystem needs time to re-stabilize. Avoid making major changes or adding new livestock for several weeks.
Moving an aquarium is undoubtedly one of the more challenging aspects of relocating, but with meticulous planning and careful execution, it is entirely achievable. Prioritize the well-being of your aquatic inhabitants by minimizing stress, maintaining water quality, and preserving your beneficial bacteria. Whether you're moving a small betta tank or a sprawling reef system, a structured approach will ensure your underwater world thrives in its new home.
Frequently Asked Questions (FAQs)
Q1: How long can fish survive in temporary containers during a move?
A1: This depends on several factors: the fish species, water volume, temperature, and crucially, aeration. With proper aeration (battery-operated air pump) and stable temperature, most fish can survive for 12-24 hours. Some hardy species might last longer, but minimizing transit time is always best. Avoid feeding them during this period to keep the water clean.
Q2: Is it necessary to save old tank water?
A2: Yes, saving at least 50-75% of your tank water is highly recommended. It helps reduce shock to your fish by reintroducing them to familiar water parameters and preserves beneficial bacteria that may be suspended in the water column. While not strictly mandatory for all moves, it significantly eases the re-establishment process and reduces post-move stress.
Q3: How do I transport live rock and filter media for a saltwater tank?
A3: Live rock should be kept submerged in buckets of original tank water with an air stone to maintain oxygenation and prevent the death of beneficial bacteria and microfauna. Filter media should also be kept submerged in tank water. Do not let either dry out, as this will kill the vital bacterial colonies.
Q4: Can I move an aquarium with gravel/sand still inside?
A4: For very small tanks (under 10 gallons), it might be possible to move with a minimal amount of substrate and water. However, for most tanks, it's highly advised to remove all water and substrate. The added weight and shifting substrate can put immense stress on the tank's seams, leading to leaks or breakage. Emptying the tank completely is the safest approach.
Q5: What should I do if my fish show signs of stress after the move?
A5: First, check your water parameters (ammonia, nitrite, nitrate, pH, temperature) immediately. Perform a small (10-20%) water change if parameters are off. Ensure proper aeration. Avoid overfeeding. If stress persists or turns into illness, be prepared to treat with appropriate medications, but try to identify the underlying water quality issue first.
Q6: How long should I wait before adding new fish after a move?
A6: It's best to wait at least 2-4 weeks after moving before adding any new fish. This allows the aquarium ecosystem to fully re-stabilize, the biological filter to recover, and your existing fish to fully acclimate and recover from the stress of the move. Closely monitor water parameters during this period.
Q7: Should I clean my filter thoroughly during the move?
A7: Only clean mechanical filter media (sponges, floss) lightly with old tank water to remove large debris. Do NOT rinse biological filter media (bio-balls, ceramic rings) under tap water, as the chlorine will kill beneficial bacteria. The goal is to preserve as much of the beneficial bacteria as possible to prevent a new tank cycle.
Categories
- Long Distance Moving162
- Local Moving120
- Commercial Moving40
- Residential Moving34
- Last – Minute Moving25
- Furniture Moving11
- Moving Tips & Lifestyle11
- Moving Tips & How-To Guides8
- Moving services7
- Long distance moving6
- Moving Costs & Budgeting6
- long distance moving6
- Moving Cost5
- Moving Cost Calculator5
- Moving Tips5
- Moving Guides5
- Moving Container4
- moving tips4
- Moving companies4
- state to state movers4
- Piano Moving3
- Car Transportation3
- Truck Rental3
- Local Move3
- best moving rates3
- cheap moving companies3
- affordable moving companies3
- full-service movers3
- Moving3
- Long-Distance Moving3
- Moving Cost Guides3
- Moving Tips & Planning3
- Junk Removal2
- Senior Moving2
- Senior Relocation Moving Companies2
- Moving Tools2
- Moving Estimates2
- interstate moving2
- College Moving2
- Dorm Moving2
- Tips for moving2
- cross-country move2
- International moving2
- Household moving2
- Relocation Guide2
- Moving Tips & State Guides2
- Heavy Equipment1
- Senior Moving Services1
- office moving1
- office relocation1
- employee relocation1
- Car Transport1
- Vehicle Shipping1
- Car Shipping Services1
- Artificial Intelligence1
- Office Moving Services1
- Commercial Moving Companies1
- Corporate Moving Services1
- Corporate Movers1
- full-service moving companies1
- sustainable moving companies1
- green movers1
- Moving in US1
- Best places to move in 20251
- 2025 moving1
- Full-Service Moving Companies1
- College moving services1
- Moving to College1
- Moving Season1
- Spring Moving1
- donate1
- sell1
- Movers in California1
- Movers in Studio City1
- Moving to California1
- Laws about Moving into California1
- Moving Laws1
- House moving1
- packing1
- cheap moving ways1
- Moving guide1
- moving across countries1
- international relocation program1
- move out cleaning1
- right packing supplies1
- pack while moving1
- Apartment moving1
- PODS1
- moving out1
- state to state move1
- California movers1
- Truck Rental1
- US Territory Relocation1
- International Moving1
- Shipping & Moving Tips1
- Moving Budget Guide1
- Moving Tools & Equipment Guides1
- Moving Services & Options1
- Moving Tips & How-To Guides1
- Moving Day & Settling In1
- Mobile Home Moving1
- Moving Guide & Tips1
- Moving Tips & State Comparisons1
- Moving Tips & City Guides1
- Moving Tips & Cost Guides1
- Long-Distance Moving Tips1
- Moving Tips & Financial Planning1
- Moving Tips & Home Preparation1
- Vehicle Shipping & Auto Transport1
- Marketing & Lead Generation1
- International Moving Guides1
- Moving Costs1
- San Francisco Moving Guide1
- NYC Moving1
- Local Movers1
- Budget Moving1
- Student Moving1
- Affordable Moving1
- Specialty Moving Guides1
- Local & Long-Distance Moving1
- Boston Moving Guide1
- Europe Relocation Guide1
- Moving Costs & Specialty Moving1
- Cost of Living1
- Relocation1
- International Moving1
- Lifestyle & Relocation1
- State Guides1
- Home Buying Guide1
- Moving Timeline1
- Real Estate Tips1
- Appliance Moving1
- Packing & Preparation1
- Interstate Relocation1
- City-to-City Moving Guide1
- Technology for Movers1
- Moving Reviews1
- Moving Costs & Storage1
- Moving Tips & Equipment Guides1
- Moving Guides & Cost Insights1
- Moving Supplies1
- Packing Tips1
- Home Moving1
- Relocation Tips1
- State Moving Guides1
- New Home Guide1
- Relocation Advice1




 Chat with us on WhatsApp!


 BBB A+ Rated
 Great! We serve your area
 Licensed & Insured
 Takes 60 seconds

 Discount expires in
 Limited Time: Only 3 premium movers available in your area


 Your information is 100% secure