


 Local Movers
 Last-Minute Movers
 Junk Removal
 Long Distance Movers
 Piano Movers
 Heavy Equipment
 Commercial Movers
 Moving Container
 Car Transportation
 Furniture Movers
 Truck Rental
 Moving Cost Calculator
 Moving Planner
 Packing Calculator
 Moving Checklist
 Moving Insurance
 FAQ
FAQ Contact Us
 Moving Loan
 Privacy Policy
 Join Our Network
 About Us
Address a Package Like a Pro: Easy Guide & Tips


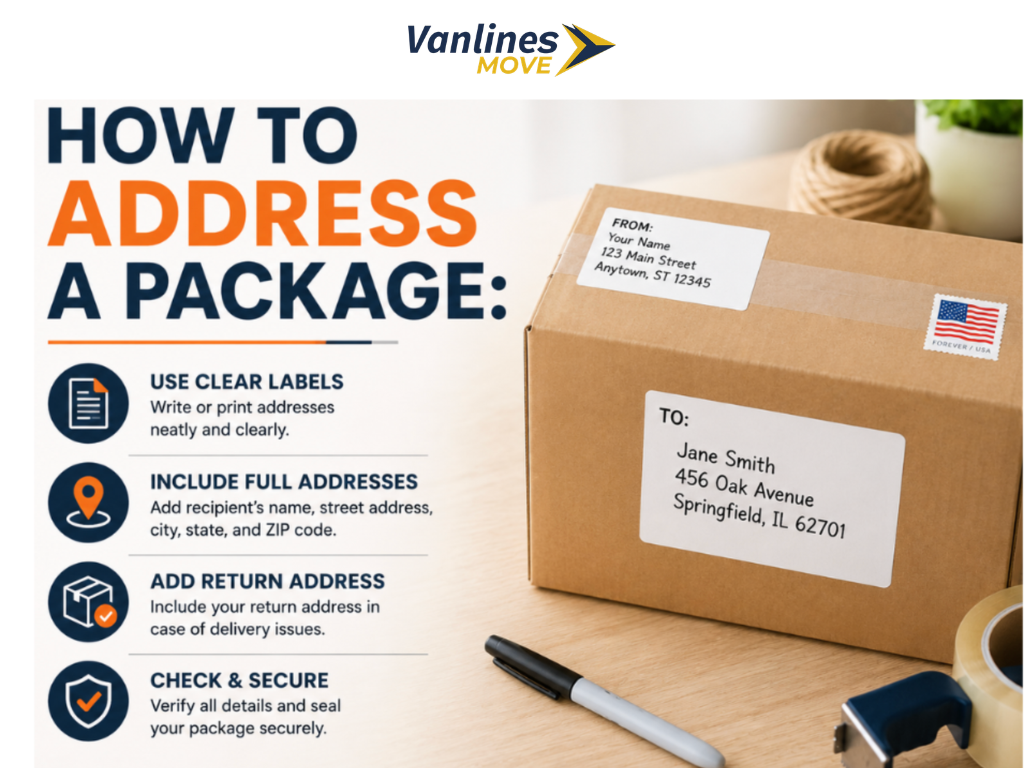
Address a Package Like a Pro: Easy Guide & Tips
Properly addressing a package is crucial for ensuring it reaches its intended destination safely and on time. Whether you're sending a birthday gift to a loved one or shipping products for your business, a clear and accurate address is essential. This comprehensive guide will walk you through the steps of addressing a package like a pro, covering everything from basic formatting to special considerations and helpful tips.
The Importance of Accurate Addressing
Before diving into the specifics, it's important to understand why accurate addressing matters. An incorrectly addressed package can lead to several problems:
- Delivery Delays: Incorrect or incomplete addresses can cause significant delays in delivery.
- Misdelivery: The package might be delivered to the wrong address altogether.
- Return to Sender: If the address is unreadable or undeliverable, the package will likely be returned to you, costing you time and money.
- Lost Packages: In some cases, packages with incorrect addresses can get lost in the shipping system.
By taking the time to address your packages correctly, you can avoid these issues and ensure a smooth delivery process.
Basic Elements of an Address
A standard address typically includes the following elements, arranged in a specific order:
- Recipient's Full Name or Company Name: Start with the name of the person or company receiving the package.
- Street Address or PO Box Number: Include the street number, street name, and any apartment, suite, or unit number. If the recipient uses a PO Box, use that instead of a street address.
- City, State, and ZIP Code: This line includes the city, state abbreviation (e.g., CA for California), and the five-digit ZIP code (and optionally the four-digit ZIP+4 code).
- Country (if shipping internationally): For international shipments, include the full country name on the last line.
Step-by-Step Guide to Addressing a Package
Here's a detailed, step-by-step guide to properly addressing a package:
Step 1: Gather the Necessary Information
Before you start writing, make sure you have all the necessary information for both the recipient's address and your return address. Double-check the information to ensure accuracy. It's always a good idea to confirm the address with the recipient, especially if you haven't sent them mail before.
Step 2: Prepare Your Package and Label
Choose a sturdy box or envelope that is appropriate for the contents you are shipping. If you are reusing a box, remove any old labels or markings. Use a permanent marker to write the address clearly and legibly. Alternatively, you can print a label using a computer and printer. Printed labels are generally preferred as they are easier to read and less prone to errors. If you're moving, consider using professional packing services to ensure your items are properly prepared for shipping.
Step 3: Write the Recipient's Address
On the center of the package, write or affix the recipient's address in the following format:
Line 1: Recipient's Full Name or Company Name
Line 2: Street Address or PO Box Number
Line 3: Apartment, Suite, or Unit Number (if applicable)
Line 4: City, State, ZIP Code
Line 5: Country (if shipping internationally)
Example:
John Doe
123 Main Street
Apt 4B
Anytown, CA 91234
United States
Step 4: Write Your Return Address
Your return address should be placed in the upper left-hand corner of the package. This ensures that the package can be returned to you if it cannot be delivered to the recipient. Use the same format as the recipient's address:
Line 1: Your Full Name or Company Name
Line 2: Street Address or PO Box Number
Line 3: Apartment, Suite, or Unit Number (if applicable)
Line 4: City, State, ZIP Code
Line 5: Country (if shipping internationally)
Example:
Jane Smith
456 Oak Avenue
Anytown, CA 91234
United States
Step 5: Affix Postage
Determine the correct postage for your package based on its weight, size, and destination. You can use a postal scale to weigh the package and visit the post office or use online postage services to purchase and print postage labels. Make sure the postage is securely attached to the package in the upper right-hand corner.
Tips for Clear and Legible Addressing
To ensure your address is easily readable and minimizes the risk of errors, follow these tips:
- Use a Permanent Marker: Use a dark, permanent marker that won't smudge or fade.
- Print Clearly: Write in block letters or print a label using a computer.
- Avoid Cursive: Cursive handwriting can be difficult to read, especially for automated sorting machines.
- Use Standard Abbreviations: Use standard postal abbreviations for states (e.g., CA for California, NY for New York).
- Write Large Enough: Make sure the address is large enough to be easily read from a distance.
- Avoid Overcrowding: Don't cram the address into a small space. Leave enough space between lines and characters.
Addressing Special Cases
Certain situations require special attention when addressing a package. Here are some common scenarios:
Addressing to an Apartment, Suite, or Unit Number
When addressing to an apartment, suite, or unit number, make sure to include it clearly on the second line of the address. Use abbreviations like "Apt," "Ste," or "Unit" followed by the number. For example:
John Doe
123 Main Street Apt 4B
Anytown, CA 91234
Addressing to a PO Box
If the recipient uses a PO Box, use that instead of a street address. The format is:
John Doe
PO Box 1234
Anytown, CA 91234
Addressing to a Military Address (APO/FPO/DPO)
When sending mail to military personnel stationed overseas, use the following format:
John Doe
Unit 2050 Box 4190
APO AP 96278
Key points to remember:
- Use the recipient's full name.
- Include the unit number or PSC number and box number.
- Use APO, FPO, or DPO as the city.
- Use AE for Armed Forces Europe, AA for Armed Forces Americas, and AP for Armed Forces Pacific as the state.
- Use the ZIP code.
- Do not include the country name.
Addressing to a Business
When addressing to a business, include the company name on the first line, followed by the recipient's name (if applicable) and the street address. For example:
ABC Company
Attn: John Doe
123 Main Street
Anytown, CA 91234
Addressing International Packages
Addressing international packages requires additional attention to detail. Follow these guidelines:
- Write the address in English.
- Include the recipient's full name and street address.
- Write the city, province/region, and postal code on separate lines.
- Write the country name in all capital letters on the last line.
Example:
John Doe
123 Main Street
Toronto, Ontario
M5V 2K7
CANADA
It's also a good idea to check the specific addressing guidelines for the destination country, as some countries may have unique requirements. You can find this information on the postal service website of the destination country.
Using Online Tools and Resources
Several online tools and resources can help you ensure your addresses are accurate and properly formatted:
- USPS Address Verification Tool: The United States Postal Service (USPS) offers an online address verification tool that allows you to check the validity of an address and standardize its format.
- Google Maps: Google Maps can be used to verify street addresses and ZIP codes.
- ZIP Code Lookup Tools: Several websites offer ZIP code lookup tools that allow you to find the ZIP code for a specific address.
These tools can be especially helpful when dealing with unfamiliar addresses or when you want to double-check the information you have.
Common Addressing Mistakes to Avoid
To prevent errors and ensure your packages are delivered successfully, avoid these common addressing mistakes:
- Incorrect ZIP Code: Using the wrong ZIP code is one of the most common addressing errors. Always verify the ZIP code using an online tool or by contacting the recipient.
- Missing Apartment or Suite Number: Forgetting to include the apartment or suite number can cause the package to be misdelivered or returned to sender.
- Illegible Handwriting: If you're writing the address by hand, make sure your handwriting is clear and legible.
- Using Old or Outdated Information: Always use the most current address information. People move frequently, so it's a good idea to confirm the address with the recipient before sending a package.
- Incorrect Country Name: When shipping internationally, make sure to spell the country name correctly and use the official name.
Avoiding these mistakes will significantly increase the chances of your package reaching its destination without any issues. Planning a move? Consider using a moving cost calculator to estimate your relocation expenses.
Addressing Packages for Return
Sometimes, you may need to address a package for return shipping. This could be for returning an item to a retailer or sending something back to yourself. The process is similar to addressing a regular package, but there are a few key differences:
- Use the Return Address Provided: If you're returning an item to a retailer, they will usually provide a pre-printed return label or a return address. Use this information exactly as it is provided.
- Include the Original Recipient's Information: In addition to the return address, it's a good idea to include the original recipient's information (your name and address) on the package. This can help the postal service identify the package and ensure it is returned to the correct sender.
- Affix the Return Label Securely: Make sure the return label is securely attached to the package. Use clear packing tape to cover the entire label and protect it from damage.
By following these steps, you can ensure that your returned package is processed correctly and arrives at its intended destination.
Conclusion
Addressing a package correctly is a simple but essential task that can save you time, money, and frustration. By following the steps outlined in this guide and paying attention to detail, you can ensure that your packages are delivered safely and on time. Whether you're sending a personal gift or shipping products for your business, mastering the art of addressing a package is a valuable skill. Remember to double-check your information, use clear and legible writing, and follow any special instructions provided by the postal service or the recipient. Taking these precautions will help you avoid common addressing mistakes and ensure a smooth delivery process. If you're looking for professional assistance with moving or shipping valuable items, consider exploring options for moving insurance to protect your belongings.
Frequently Asked Questions (FAQs)
1. What is the correct format for writing an address on a package?
The correct format is: Recipient's Full Name or Company Name, Street Address or PO Box Number, Apartment/Suite/Unit Number (if applicable), City, State, ZIP Code, and Country (if shipping internationally).
2. Where should I put the return address on a package?
The return address should be placed in the upper left-hand corner of the package.
3. What should I do if I don't know the ZIP code for an address?
You can use an online ZIP code lookup tool or contact the recipient to obtain the correct ZIP code.
4. How do I address a package to a military address (APO/FPO/DPO)?
Use the recipient's full name, unit number or PSC number and box number, APO, FPO, or DPO as the city, AE, AA, or AP as the state, and the ZIP code. Do not include the country name.
5. Can I use abbreviations when writing an address on a package?
Yes, you can use standard postal abbreviations for states (e.g., CA for California, NY for New York) and common abbreviations like "Apt" for apartment and "Ste" for suite.
6. What type of pen should I use to address a package?
Use a dark, permanent marker that won't smudge or fade.
7. Is it better to write the address by hand or print a label?
Printing a label is generally preferred as it is easier to read and less prone to errors, but writing clearly with a permanent marker is also acceptable.
Categories
- Long Distance Moving162
- Local Moving120
- Commercial Moving40
- Residential Moving34
- Last – Minute Moving25
- Furniture Moving11
- Moving Tips & Lifestyle11
- Moving Tips & How-To Guides8
- Moving services7
- Long distance moving6
- Moving Costs & Budgeting6
- long distance moving6
- Moving Cost5
- Moving Cost Calculator5
- Moving Tips5
- Moving Guides5
- Moving Container4
- moving tips4
- Moving companies4
- state to state movers4
- Piano Moving3
- Car Transportation3
- Truck Rental3
- Local Move3
- best moving rates3
- cheap moving companies3
- affordable moving companies3
- full-service movers3
- Moving3
- Long-Distance Moving3
- Moving Cost Guides3
- Moving Tips & Planning3
- Junk Removal2
- Senior Moving2
- Senior Relocation Moving Companies2
- Moving Tools2
- Moving Estimates2
- interstate moving2
- College Moving2
- Dorm Moving2
- Tips for moving2
- cross-country move2
- International moving2
- Household moving2
- Relocation Guide2
- Moving Tips & State Guides2
- Heavy Equipment1
- Senior Moving Services1
- office moving1
- office relocation1
- employee relocation1
- Car Transport1
- Vehicle Shipping1
- Car Shipping Services1
- Artificial Intelligence1
- Office Moving Services1
- Commercial Moving Companies1
- Corporate Moving Services1
- Corporate Movers1
- full-service moving companies1
- sustainable moving companies1
- green movers1
- Moving in US1
- Best places to move in 20251
- 2025 moving1
- Full-Service Moving Companies1
- College moving services1
- Moving to College1
- Moving Season1
- Spring Moving1
- donate1
- sell1
- Movers in California1
- Movers in Studio City1
- Moving to California1
- Laws about Moving into California1
- Moving Laws1
- House moving1
- packing1
- cheap moving ways1
- Moving guide1
- moving across countries1
- international relocation program1
- move out cleaning1
- right packing supplies1
- pack while moving1
- Apartment moving1
- PODS1
- moving out1
- state to state move1
- California movers1
- Truck Rental1
- US Territory Relocation1
- International Moving1
- Shipping & Moving Tips1
- Moving Budget Guide1
- Moving Tools & Equipment Guides1
- Moving Services & Options1
- Moving Tips & How-To Guides1
- Moving Day & Settling In1
- Mobile Home Moving1
- Moving Guide & Tips1
- Moving Tips & State Comparisons1
- Moving Tips & City Guides1
- Moving Tips & Cost Guides1
- Long-Distance Moving Tips1
- Moving Tips & Financial Planning1
- Moving Tips & Home Preparation1
- Vehicle Shipping & Auto Transport1
- Marketing & Lead Generation1
- International Moving Guides1
- Moving Costs1
- San Francisco Moving Guide1
- NYC Moving1
- Local Movers1
- Budget Moving1
- Student Moving1
- Affordable Moving1
- Specialty Moving Guides1
- Local & Long-Distance Moving1
- Boston Moving Guide1
- Europe Relocation Guide1
- Moving Costs & Specialty Moving1
- Cost of Living1
- Relocation1
- International Moving1
- Lifestyle & Relocation1
- State Guides1
- Home Buying Guide1
- Moving Timeline1
- Real Estate Tips1
- Appliance Moving1
- Packing & Preparation1
- Interstate Relocation1
- City-to-City Moving Guide1
- Technology for Movers1
- Moving Reviews1
- Moving Costs & Storage1
- Moving Tips & Equipment Guides1
- Moving Guides & Cost Insights1
- Moving Supplies1
- Packing Tips1
- Home Moving1
- Relocation Tips1
- State Moving Guides1
- New Home Guide1
- Relocation Advice1




 Chat with us on WhatsApp!


 BBB A+ Rated
 Great! We serve your area
 Licensed & Insured
 Takes 60 seconds

 Discount expires in
 Limited Time: Only 3 premium movers available in your area


 Your information is 100% secure